Showing posts with label Holidays. Show all posts

Sunday, March 31, 2013

Easter...Part 1!

Happy Easter to those who celebrate today! We are in a unique situation at my house...I grew up Catholic but converted to Greek Orthodox when I married my husband. Easter is the only holiday that falls on a different day between the two, so even though it will be another month before we celebrate Orthodox Easter, we had the pleasure of hosting my side of the family today to celebrate their Easter. We had 15 people for dinner, and although it was pretty crowded, I think everyone had a good time. Here is a peak at our setup for the day...

Saturday night we dyed Easter eggs, I dyed pink eggs and green eggs to use as place cards for Easter dinner. I placed a sticker on each egg that represented each guest's first initial and placed them on the table. I also tried out paper placemats for the first time, and I have to say, I LOVED them. Super cute and you don't have to worry about ruining them like you do with cloth napkins and placemats. You can buy them here, or if you are in the Pittsburgh area, you can find them at House 15143.


The delicious cake is from Oakmont Bakery...one of our favorites!


I picked up the cute little chalkboard from House 15143...I love that I can change it for the different holidays.


And a couple dining room pictures...by the way, my Dad and I are hoping to sell the wooden ruler growth charts that you can see hanging in this next picture at a local craft show this summer. More info to come once it is confirmed! :)


I hope you all had a great day with your family and friends, whether you celebrated Easter today or not. As always, thanks for reading!

Sharing with...
The DIY Showoff
My Uncommon Slice of Suburbia

Tuesday, March 12, 2013

Easter Wreath

Anyone else feel like Easter just snuck up on them this year?  I certainly feel like it did! Its only a few weeks away now, and honestly didn't I just take down my Christmas decorations?! Oh wait I did just take them down in February!  Anyway, I wanted to try to make a cute wreath for my front door made out of plastic Easter eggs this year.  My first attempt ended in a crafting injury. I thought I could string the eggs with wire (the plastic eggs I had had little holes in the bottoms) and wrap them around a Styrofoam wreath.  Well it started out fine, until I accidentally stuck the wire through my finger!  I had to pull the wire out of my finger which left 2 bloody holes and then my finger swelled up. Hmmm, when was my last tetanus shot?!? So I decided to just use my trusty glue gun instead and it resulted in no injuries this time!

For this project you'll need:
- Styrofoam wreath
- about 24 plastic eggs (depending on the size of your wreath)
- ribbon
- glue gun


Tie your ribbon to hang the wreath on first, otherwise it will be hard to get the ribbon around the eggs.  Then just start gluing your eggs on.


Now you could probably glue the eggs in rows all going the same way, but I think it looks cute with the eggs going in different directions.  It all just depends on what you like.  When I was done, there was a lot of the white wreath showing through some of the spaces between the eggs.  So my solution was to take ribbon and glue it down in the spaces. I used a toothpick to get it into the tight spaces and it worked out pretty easily.
 
The finished product:


Overall, I'd say this is a pretty easy project to do.  You need only a few materials and the only skill required is to know how to work a glue gun.  Gluing everything can get tedious, but it didn't take me longer than an hour and a half to finish. So get gluing!

Friday, February 15, 2013

Valentine's Day....a day late!

Ok, so we all now know that the "S" in HSB stands for SLACKER! Seriously I have had no motivation to do anything these past few weeks.  I think its because its winter; I am so sick of coats and snow and coldness! I'm ready for summer and the playground! Anyway so after I saw Hooch and B posting all their cutesy Valentine's Day projects, I thought I'd do some too. Then I realized Valentine's Day was the next day! Eeek!!! But I managed to still do somethings just with what I already had at home.

First I am a total copy cat and made B's heart shaped cake.  Mine didn't turn out quite as symmetrical though.  I think my round cake pan is 9" and my square one is 8". Oh well it will do. And I let Bug decorate it so it looks beautiful to me!


With my left over cake mix I wanted to try to make heart shaped cupcakes.  I had seen this before done with marbles, but I didn't have any.  So instead I rolled up balls of foil and put them in the cupcake pan like this:


Now what I learned when doing this: Don't fill up the papers any more than halfway.  The ones I filled up the highest didn't turn out.  The top just puffed out over the part where the foil was and looked like a regular cupcake. Here is the difference.

 
I just cut the top off the of them though and they turned back into hearts. 
 
 
For a craft for Bug, I got an empty toilet paper roll, bent it, and put a rubber band around it and let her dip it in paint and make heart stamps.  It was so simple, but she loved doing it!


And for a special dinner I made, one of Bug's favorite Pink (Cranberry) Chicken.
You need: 6 chicken breasts (I do frozen)
1 can of whole cranberry sauce
1 small bottle of Catalina dressing
1 packet of onion soup mix
 
Dump it all in the crock pot and cook on low for about 6 hours.  I serve it over rice, but you could do mashed potatoes, or noodles or whatever you like!
 
So there you have it, those were our Valentines Day activities! As simple and last minute as they were, Bug enjoyed all of it! 
 
See ya later peeps!


Thursday, February 14, 2013

A Valentine's Day Treat

First off, Happy Valentine's Day! I have to admit, I was never a huge fan of this holiday, but now that my daughter is getting old enough to be excited about it, I have come to appreciate and actually look forward to February 14th!

For Felicity's preschool Valentine's Day party, her teacher asked me to provide the class snack. Luckily, none of her classmates suffer from any food allergies, which left my choices on what to make pretty much wide open. Instead of doing cookies or cupcakes, I decided to make individual pudding cups for each child. These were so easy to make, and I have to say, they turned out to be really cute!

To make them, I used things I already had on hand...Chinet cups, cupcake liners, ribbon and of course, pudding mix. I layered chocolate pudding with vanilla pudding that I dyed pink using red food coloring...then topped everything off with crushed Oreos. I then used cupcake liners to cover the tops and tied a ribbon around the cup to hold it all together. The adorable wooden stamped spoons were ordered from this awesome Etsy shop...the best part about the spoons is that the full proceeds are donated to a charity that supports those effected by the Sandy Hook Elementary School tragedy.


You can easily make these work for any holiday by changing up the liners and the ribbon...the possibilities are endless! I will be back later this week to give you all a peek at the Valentine's Day surprise my husband and I have planned for Felicity. Fingers crossed she LOVES it!

What Valentine's Day treats did you make this year? Share in the comments!

Linking up to these fabulous blogs:
Jennifer Rizzo
Bower Power

Monday, February 11, 2013

Be My Valentine

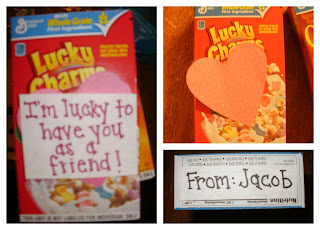
So, last year for Valentine's Day, I came up with this brilliant idea to use miniature boxes of cereal with cute little sayings that go along with the cereal name/brand. (ex: Frosted Flakes "I think you're greeeeat!")  I was so excited because, at a time when Pinterest was the new place to go for ideas, I came up with this one all on my own.  Needless to say, I wasn't the first one to think of it...I found all kinds of pictures and examples later on Pinterest.  But that's ok.  I'm still going to claim it as mine!

When I went shopping, my choice of miniature cereals were somewhat limited.  I could either go with the General Mills boxes or Kellogg's boxes.  I had some good sayings already for Lucky Charms and Honey Nut Cheerios, so General Mills won! 


Cocoa Puffs: "I'm cuckoo for you friend!"
Trix: "There's no Trickin', You're a great friend!"
Frosted Cheerios: "You're a cool friend!"
Honey Nut Cheerios: "Bee my Valentine!"
Lucky Charms: "I'm lucky to have you as a friend!" or "I think you're charming!"
Cinnamon Toast Crunch: "You are the sweetest friend!"
Golden Grahams: "Our friendship is Golden!"
Cheerios: "You make my heart cheerful!"

I pasted the sayings on top of a pink heart-shaped Post it note and added Jacob's name to the top of the box.


I think they are very cute, and I'm happy with them...and so is Jacob!

I also wanted to share, in case you haven't already seen this, how to make a heart shaped cake.

All you need is one 9 in square baking pan and one 9 in circle baking pan.  You can use one box of cake mix and split it between the two pans. (I happened to use half chocolate and half yellow cake, because I also made cupcakes.)

  Once the cakes are baked and cooled, you place the square cake on its side (so it is shaped like a diamond).  With the circle cake, you cut it in half and place the two half circles on either side top of the diamond. 
Voila! You have a heart shaped cake and can decorate it as you please.


Saturday, December 22, 2012

HSB Christmas Party!

Earlier this week we realized Christmas was only a week away and if we wanted to have a Christmas party we better do it soon!  So on Friday we gathered at B's house with our little ones for a fun filled afternoon of cookie and "tree" decorating.  Of course B had everything set up adorably!


For some reason I was left in charge of the cut out cookies...here is a sampling of some of my best work...NOT!!


Just kidding, those were the only burnt ones.  And B, never one to let anything go to waste, said she is going to hang them on her Christmas tree! Doesn't that last one look like a cracker or a pita chip or something?! Its supposed to be a present!

Anyway the first thing we let the kids do is make some trees.  This is a great project for little ones, instead of making gingerbread houses.  All you need to do is get ice cream cones and put green icing on them then let the kids decorate them with candy, sprinkles, gum drops, or whatever you like!  At first Jacob wasn't that into it as evidenced by this picture.


But eventually all the kids got into the spirit and had a lot of fun doing this!


By the time the kids were done decorating their trees, they were not really that interested in decorating cookies, so us moms got to work decorating.  B wanted to make strands of lights on the round sugar cookies, and they came out really cute!


Hooch was so caught up in the Holiday spirit while decorating these cookies she began serenading me and B Christmas carols and even admitted that there are Christmas songs that make her cry every time she hears them.  (Can anyone guess what they are??) She even got creative and decided to make a Grinch face and a Christmas tree on some of the cookies.


(She said that is the Grinch after his heart grows!)
 

B also had a delicious Grinch Punch that she made with lime sherbet and ginger ale.  It was so good and even the kids loved it!


Also take notice of her lovely DIY Advent calendar in the background!

All in all our HSB Christmas party was a hit, the kids had fun, ate a lot of icing and candy, and HSB did some cute decorating and had a lot of laughs!

Now on to do last minute Christmas shopping, baking, and cleaning!!

Monday, December 17, 2012

Life...And A Holiday Treat

Like many of you, I spent most of my weekend glued to the news with tears in my eyes listening to the information coming out of Connecticut. As a parent, I cannot imagine the pain and suffering that the families and friends of the victims will face literally for the rest of their lives. Like any tragedy that captures the attention of the country, we tend to find ourselves moving forward and on with life after the initial shock of the events wears off. In the weeks and months to come, please remember to keep the victims, their families and the children and adults who survived this tragic event in your thoughts and prayers as they struggle to move forward with what will now be a completely different life.

On Thursday, I attended my daughter's first preschool Christmas program. Let me tell you, there is nothing sweeter than watching a bunch of 3 and 4 year olds dressed up as the nativity while singing Christmas songs. Felicity was assigned the part of an angel in the play and the parents were told to provide the costume. I used an old white tutu that I had made last year at Christmas (the same tutu that Bug wore in this post) and paired it with a white turtleneck and leggings. I had purchased all of the supplies to make angel wings when I ran into pre-made wings at JoAnn Fabrics on clearance for six dollars. Even though I love making things, sometimes it is cheaper and quicker to just purchase the items, which is exactly what I did in the case. I may be a little biased, but I think she is the cutest angel ever, 90's gangsta pose and all! LOL


I finished off the weekend by spending my afternoon making a cute holiday treat for Felicity's preschool Christmas party. I placed three marshmallows on a lollipop stick to create a snowman and used icing to draw a face, bowtie and buttons. I also used one half of an oreo as well as a whole mini oreo to create a top hat for the snowman. I'm keeping my fingers crossed that they stay in tact until they are handed out to the class on Tuesday!


I hope you were all able to spend time with your families this weekend...unfortunately, sometimes it takes a tragedy to remind us all that life's little moments are so important. As always, thanks for reading!

Sharing with...
The DIY Showoff

My Uncommon Slice of Suburbia

Jennifer Rizzo

Friday, December 7, 2012

Stonf's Crafty Christmas

So are you guys ready to see my holiday decorations? After taking tours of Hooch's and B's decorated houses I bet you are super excited to see mine! Well my holiday decor is very different from Hooch's and B's.  I do have nice Christmas decorations, but they are in the scary part of my basement. You know the part with all the spiders, eeeek! I'm too chicken to go down there and get them so I have to make do with what I have available (in the nice part of my basement) which isn't much.  So this year I decided to do some Christmas crafting rather than risk seeing a spider or walking into a spider web.

I had seen ornaments hanging in windows and always thought that it looked so pretty.  The pictures I looked up used a tension rod, but I couldn't use one because of the way my blinds are so I just used those Command hooks and wire.  I bought a big tube of ornaments and tied ribbons to them and then tied them to the wire.  I really like how it turned out.  I might even do this in my front window too!


(It looks better when the blinds are up but the sun was glaring and messing up my picture!)

When I was looking up wreaths on Pinterest I found some pictures of things you could use as alternatives for wreaths on your front door and found this. It looked easy enough to make, and it was.  I spray painted an old black frame white, tied some ornaments to ribbons and stapled them on the back and tied a pretty red bow on the top.


I also made that little Merry Christmas banner.  I just traced stencils on card stock, cut them out and glued the letters to ribbon.  I saw cute banners like that made of felt, but felt is too hard for me to cut!

I'll also share with you my mantel. 


I didn't really craft anything on the mantel, but the wreath above it should look familiar! 

Now to my Christmas craft fail.  I was shopping at Target (where else?) the other day and saw these and these and thought they were adorable.  But I didn't feel like spending the money to buy them when I thought I could easily make them.  I already had Styrofoam balls and trees at home, so all I needed was the sweater material.  I drove over to Goodwill and bought a few sweaters that I thought would work. 


Now I should have inspected the ones at Target better because I had no idea where to start.  I just started cutting and gluing.  It was a mess and none of them really turned out that well.  The trees looked ok, because I eventually realized to use the sleeves for them and that worked the easiest.  Still not the prettiest, but here's what I ended up with.
 
 
Ha ha, don't laugh! Its the best I could do.  They are pretty sad looking though! Now the balls...I just couldn't do it.  Every way I tried left something open or it bunched in a funny way.  This is the best one I made and the top isn't even covered!


I think the sweaters were just too big and thick.  Something smaller and tighter like a sock probably would have worked better.  Maybe I'll try again.  Or maybe I'll just go back to Target and fork over the money and save myself some aggravation and fabric glue!


Now on to the good stuff!! To thank you all for being so wonderful, we are hosting a giveaway.  If you want to win a $25 gift card to Target (you can buy a few of those trees and ornaments with that!) just answer this question in the comments of this post: What is your favorite Christmas movie??

The deadline to comment will be this Sunday at 9pm EST. The winner will be picked randomly and will be announced in Monday's post.  And remember to leave your name in the comment if you post using an anonymous account so that we know who you are. Good luck! (This giveaway is now closed)

P.S. My favorite Christmas movie is The Nightmare Before Christmas...or is that a Halloween movie?!

Wednesday, December 5, 2012

B's Festival of Trees

The day after Thanksgiving, while most people were out shopping the Black Friday deals, I was at home, getting my house all ready for Christmas.  (*Side note: I have always been a strong believer in waiting until after Thanksgiving before doing anything Christmas.  But as the years go by, I'm finding it harder to resist listening to the Christmas music and putting up our tree before Thanksgiving.)  With Ronnie outside, hanging lights on the house, I was inside working on the trees!  Yes, I said trees, with an S!  Let me give you a little background story.  My love for Christmas decorating definitely comes from my parents.  To this day, I've never seen a more beautiful Christmas tree than the one they put in their living room.  My favorite part of their tree is that they have so many different and unique ornaments, and each one has its own story. (My Dad could probably tell you when, where or from whom each and every ornament came!)  And growing up, my siblings and I each had our very own tree in our rooms that we got to decorate.  I always loved this idea, so I have carried on that tradition with my kids. 

Jacob's tree:  The theme of his tree is "Shades of Blue".  Blue ribbon, blue beads, and blue and silver ornaments decorate his tree.  Who's that angel at the top of the tree?!
Julia's tree:  I was so excited about Julia's tree this year.  Last year, I found all of these adorable candy and gingerbread ornaments on sale at Kohls after Christmas, and the theme of her tree was decided, "Candyland".  Candy canes, gingerbread, ice cream cones, pink tulle and pink ornaments decorate her tree.  (The big pink ornament balls were actually used as decoration at our wedding!)


Living room tree:  We have a 8 ft artificial tree that we use as our "main" tree.  This tree normally has white bead garland, white pearl lights, and all different kinds of ornaments, but I decided to do it differently this year.   This year, I used red berry branches, pine cones, gold ribbon, and red, white, and gold ornaments.  I still feel like it's missing something, maybe big red poinsettias or big red ornament balls.  What do you think?
 
I made the bow tree topper using gold ribbon.  I used this tutorial, and it was super easy to make! 

Basement tree:  Lastly, what should we do with all the ornaments that we didn't use this year on the main tree?  Well, buy another tree, of course!  I love this little Christmas corner in our basement.  I call these our "Memories" trees.  They include different ornaments from over the last 7 years that Ronnie and I have been married, from Our First Christmas to Jacob and Julia's first Christmases and many more! 


Now you get to see what Ronnie was working on!

Cue Clark Griswold singing, "Joy to the World" as he plugs the lights in! 
(I know the 2 windows are missing wreaths...we can't find them!  We're on our way to buy 2 more right more!)
Ok, so maybe it's not that many lights....but we're not done yet! haha!


I hope you enjoyed the tour of B's Festival of Trees!