Wednesday, February 20, 2013

A gift for a Prego

One of my friends is pregnant (Yay!!!) so its time to get started crafting baby gifts for her and the baby.  I have been wanting to make these onesie cupcakes for awhile but I didn't have anyone to give them too so finally here is my chance!


This is super simple to make, only requires a few items, and ends up looking adorable! Those are my favorite kinds of crafts! So all you need is onesies, socks, tape and a cute box.  I had a hard time finding all red socks (I'm disappointed in you, Target!). But I did find socks with red and pink on them and I made it work. Tape will be your best friend while making these.

Fold the onesie into thirds and put the sock in the end.
Roll it up.


Tape the end.
 
 
Put them in a box and tie a bow around it.
 
 
The smaller size the onesie the smaller and tighter your cupcake will be.  The yellow and white ones I made are 9 months and they ended up pretty big and thick and were a little harder to manipulate into the shape I wanted, but with plenty of tape you can make it work. Cute, easy and practical!


Sunday, February 17, 2013

My next project...

You've already seen my daughter's big girl room in this post, but I've never shared pictures of her nursery. Since moving Felicity into her new big girl room, the nursery was basically sitting there as is, the only change being that we removed the crib and added our old full size bed into the room to serve as a temporary guest room. My husband's entire family and my sister and brother in law all live away from us, so we frequently have overnight guests. We needed a room that would function as a guest room when visitors were in town, but since the room was small, we didn't want a large bed taking up the entire room all of the time. Last month, we removed the full sized bed and bought a sleeper sofa with plans on changing this room into a "man cave" that could also function as a guest room when needed. We've already started some projects to change the room, but today's post is about sharing the "before" pictures...let's take a visit to Felicity's nursery...


The crib has been removed and placed in storage...just in case :)


The green chair is now in her big girl room and serves as a place for us to read her many books


The monogram plate has also been moved to her new room. Not sure if the shelves are going to be painted and remain in the "man cave" or if they will be sold at our annual summer yard sale.


I love this chandelier, but we purchased a new, larger chandelier for the big girl room. That means this one will be hitting Craigs List soon!

Hope you enjoyed a walk with me down memory lane. I will be back soon to share my first project for the new man cave/guest room...pillows made out of cloth napkins!

Friday, February 15, 2013

Valentine's Day....a day late!

Ok, so we all now know that the "S" in HSB stands for SLACKER! Seriously I have had no motivation to do anything these past few weeks.  I think its because its winter; I am so sick of coats and snow and coldness! I'm ready for summer and the playground! Anyway so after I saw Hooch and B posting all their cutesy Valentine's Day projects, I thought I'd do some too. Then I realized Valentine's Day was the next day! Eeek!!! But I managed to still do somethings just with what I already had at home.

First I am a total copy cat and made B's heart shaped cake.  Mine didn't turn out quite as symmetrical though.  I think my round cake pan is 9" and my square one is 8". Oh well it will do. And I let Bug decorate it so it looks beautiful to me!


With my left over cake mix I wanted to try to make heart shaped cupcakes.  I had seen this before done with marbles, but I didn't have any.  So instead I rolled up balls of foil and put them in the cupcake pan like this:


Now what I learned when doing this: Don't fill up the papers any more than halfway.  The ones I filled up the highest didn't turn out.  The top just puffed out over the part where the foil was and looked like a regular cupcake. Here is the difference.

 
I just cut the top off the of them though and they turned back into hearts. 
 
 
For a craft for Bug, I got an empty toilet paper roll, bent it, and put a rubber band around it and let her dip it in paint and make heart stamps.  It was so simple, but she loved doing it!


And for a special dinner I made, one of Bug's favorite Pink (Cranberry) Chicken.
You need: 6 chicken breasts (I do frozen)
1 can of whole cranberry sauce
1 small bottle of Catalina dressing
1 packet of onion soup mix
 
Dump it all in the crock pot and cook on low for about 6 hours.  I serve it over rice, but you could do mashed potatoes, or noodles or whatever you like!
 
So there you have it, those were our Valentines Day activities! As simple and last minute as they were, Bug enjoyed all of it! 
 
See ya later peeps!


Thursday, February 14, 2013

A Valentine's Day Treat

First off, Happy Valentine's Day! I have to admit, I was never a huge fan of this holiday, but now that my daughter is getting old enough to be excited about it, I have come to appreciate and actually look forward to February 14th!

For Felicity's preschool Valentine's Day party, her teacher asked me to provide the class snack. Luckily, none of her classmates suffer from any food allergies, which left my choices on what to make pretty much wide open. Instead of doing cookies or cupcakes, I decided to make individual pudding cups for each child. These were so easy to make, and I have to say, they turned out to be really cute!

To make them, I used things I already had on hand...Chinet cups, cupcake liners, ribbon and of course, pudding mix. I layered chocolate pudding with vanilla pudding that I dyed pink using red food coloring...then topped everything off with crushed Oreos. I then used cupcake liners to cover the tops and tied a ribbon around the cup to hold it all together. The adorable wooden stamped spoons were ordered from this awesome Etsy shop...the best part about the spoons is that the full proceeds are donated to a charity that supports those effected by the Sandy Hook Elementary School tragedy.


You can easily make these work for any holiday by changing up the liners and the ribbon...the possibilities are endless! I will be back later this week to give you all a peek at the Valentine's Day surprise my husband and I have planned for Felicity. Fingers crossed she LOVES it!

What Valentine's Day treats did you make this year? Share in the comments!

Linking up to these fabulous blogs:
Jennifer Rizzo
Bower Power

Monday, February 11, 2013

Be My Valentine

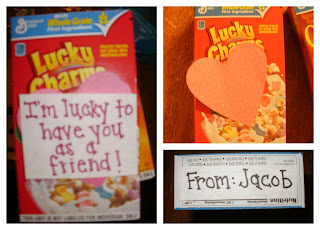
So, last year for Valentine's Day, I came up with this brilliant idea to use miniature boxes of cereal with cute little sayings that go along with the cereal name/brand. (ex: Frosted Flakes "I think you're greeeeat!")  I was so excited because, at a time when Pinterest was the new place to go for ideas, I came up with this one all on my own.  Needless to say, I wasn't the first one to think of it...I found all kinds of pictures and examples later on Pinterest.  But that's ok.  I'm still going to claim it as mine!

When I went shopping, my choice of miniature cereals were somewhat limited.  I could either go with the General Mills boxes or Kellogg's boxes.  I had some good sayings already for Lucky Charms and Honey Nut Cheerios, so General Mills won! 


Cocoa Puffs: "I'm cuckoo for you friend!"
Trix: "There's no Trickin', You're a great friend!"
Frosted Cheerios: "You're a cool friend!"
Honey Nut Cheerios: "Bee my Valentine!"
Lucky Charms: "I'm lucky to have you as a friend!" or "I think you're charming!"
Cinnamon Toast Crunch: "You are the sweetest friend!"
Golden Grahams: "Our friendship is Golden!"
Cheerios: "You make my heart cheerful!"

I pasted the sayings on top of a pink heart-shaped Post it note and added Jacob's name to the top of the box.


I think they are very cute, and I'm happy with them...and so is Jacob!

I also wanted to share, in case you haven't already seen this, how to make a heart shaped cake.

All you need is one 9 in square baking pan and one 9 in circle baking pan.  You can use one box of cake mix and split it between the two pans. (I happened to use half chocolate and half yellow cake, because I also made cupcakes.)

  Once the cakes are baked and cooled, you place the square cake on its side (so it is shaped like a diamond).  With the circle cake, you cut it in half and place the two half circles on either side top of the diamond. 
Voila! You have a heart shaped cake and can decorate it as you please.


Sunday, February 3, 2013

Cowgirl 4th Birthday

"What's that I hear? Crickets?" Yep, that's pretty much all that you have heard from HSB in the last month or so...things got crazy busy for all three of us around the holidays and because of it, the blog definitely took a back seat. But, we are back and ready to bring you some new fun ideas and updates.

Last week was my daughter's fourth birthday (seriously, how the heck did that happen? I remember being in the hospital with her like it was yesterday!) Anyway, she had been asking for a cowgirl themed birthday party since last April when we visited a local farm where she went on her first pony ride. So, that's exactly what we had...a vintage style cowgirl party! And now, the pictures...


The farm where we had the party provided the cute barrel horses, photo boards and pin the tail on the donkey.


I had the ombre rosette cake and cupcakes made for the party and added simple cake bunting that I made out of fabric. I also made the lace doily garland using a package of paper doilies from the Dollar Tree and twine.


I kept it simple on the tables with brown tablecloths and mason jars filled with white daisies sitting on more doilies.


For favors, I made 14 stick horses for the kids. They were a hit, thank goodness, because they took me FOREVER to make! Its not that they were hard to make, just tedious. It was all worth it though after seeing the kids running around riding their horses. In addition to the stick horses, the kids also had the opportunity to ride Spanky the pony. They all had a blast...and my daughter is already talking about and planning her 5th birthday party. This Momma needs a break! LOL


Sharing with The DIY Showoff
My Uncommon Slice of Suburbia
Jennifer Rizzo