Thursday, August 15, 2013

HSB Goes...to Idlewild Park

Ok, so here we are.  It's the middle of August.  Doomsday, I mean, the first day of school is drawing ever so close.  And with summer coming to its inevitable end, Hooch suggested we take the kids to Idlewild Park for one last hurrah!  It was the perfect idea! Hooch and Stonf got to the park about an hour before I did, and spent some time at the Soak Zone water park until we arrived.  Once we got there and met up with everyone, we set out to ride as many rides and see as many things as we could.  Here are some of the pictures from our day! 
   Note: My "9 months pregnant" status kept me from riding anything and I assumed the role of photographer for the day.  Unfortunately, I don't have any lovely pictures of me waddling around the park or riding the benches or hunting down my favorite craving, Blue Raspberry ICEEs. 
   One of our first adventures...the "Rollocoaster".  All of our kids were big enough to ride along with an adult, and with a little bit of convincing, all the kids decided to give it a try.  What you do not see pictured are the faces of the kids AFTER the ride.  We'll just say the 2 out of the 4 kids were not exactly happy with their decision. 

One of my favorite parts of Idlewild is Story Book Forest, and since it closed before the rest of the park, we made our way over there next. 


After Story Book Forest, we stopped at Jumping Jungle.  Tons of fun for everyone...except Hooch's husband!  Let's just say, Climbing net - 1, George's sandal - 0.  Fortunately, over at the water park, he was able to buy replacement sandals so he wouldn't have to walk barefoot the rest of the day. 
 

Last, but not least, we took the kids to Raccoon Lagoon (kiddie land) where all the rides are for kids between the height of 36" and 56"...aka My amusement park paradise! (I'm not going to lie, even if I weren't 9 months pregnant, I wouldn't be riding any rides.  As much as I love watching my kids enjoy them, I am NOT a fan!)

This has to be my favorite picture of the day!  I just love the before and after expressions.  Obviously, someone wasn't sharing the wheel!


Another favorite...love their faces in this one!
All in all, we had a fun day!!  And, you know, we wouldn't be keepin it real if we didn't have to run to our cars in the pouring down rain at the end of the day!

Friday, July 19, 2013

HSB Goes...to Biba Part 2 Taco Tuesday!!

Hello friends! We are well into summer now, and life has gotten busy and it had been awhile since HSB has gotten together (without kids) for a business meeting.   Meaning, business meeting = out for a fancy dinner of course!  So before we get even busier with vacations and such we decided we needed to go out. And where else would we go but our new favorite eatery, Biba!! If you are an HSB follower you know from our previous post here how much we love this place! Every Tuesday they run a Taco Tuesday special where they feature two different kinds of tacos for $5. For weeks now they have been teasing me on their Facebook page with these delicious sounding tacos, so we decided to try it out...for professional blogging purposes!
I arrived first and it was busier than I had ever seen it. We didn't make any reservations so I was nervous we wouldn't get a table, but my buddy Jeffery squeezed us in! So if you plan on going to Taco Tuesday it would be wise to make reservations. Once we all arrived and opened my already open bottle of Moscato we were ready to eat! First we ordered my favorite Guac and Chips with smoked blue cheese and apples.
After I had this the first time I went I tried to make my own blue cheese guac....it sucked! I'll just get it from Biba from now on. Hooch also ordered the Skillet Fries, but for some reason I forgot to take a picture of it. I guess you'll just have to take my word for it that they looked awesome! (I didn't taste them though....they had bacon on them.)

Next we had Crabcakes with cucumber carrot salad and Sriracha mayo. You can't go wrong with a good crabcake and to say these were good would be an understatement!


Finally, it was Taco time! Hooch and I had the chicken tacos with goat cheese guac and pineapple. B  had the pork tacos with cucumber carrot salsa, Sriracha mayo, and cilantro.
 

Seriously these crappy phone pictures of mine do not do it justice!

Now for dessert...and we got all three desserts that were offered. Don't judge. Hey, if you want an accurate review we have to try them all...right?! So we ordered the Churros with the chocolate habanero sauce (which we already had before, but we had to make sure they were still good...they were!)
Next we had the Brown Butter Pound Cake with goat cheese whipped cream and strawberries and blueberries. Oh my was that goat cheese whipped cream delicious!

And lastly was the Banana S'mores Bread Pudding. Holy moly was this delicious! This was by far my favorite.


So if you haven't been yet, you should definitely go soon.  Taco Tuesday is an awesome deal! Thank you again to the chefs and wait staff for another enjoyable evening! And also a special thank you to the table next to us for corking up our wine!

I think this dining experience can be summed up by Hooch's quote of the night "I'm in hog heaven!"

Wednesday, July 17, 2013

New Bathroom

When we moved into our house 8 years ago, I didn't take the time to paint or change much of anything.  It's not that I necessarily "liked" or would have chosen the paint or decor of our house, but I didn't dislike it enough to take the time to change it.  Well, I've been a stay at home mom for the last 6 years, and since I spend most of my time at the house, I am always looking at what things I would like to change.  We've been talking about redoing our bathroom for the last couple years, and this spring, we actually finally got to work.  Yes, you read that right.  This whole bathroom project started back in March.  One thing I must admit is that I am the queen of unfinished projects!  Not that I'm proud of it, but it is what it is.  (For instance, before we even got "Project Bathroom" finished, I started ripping down wallpaper off the walls in our entryway while Ronnie was at work one day.  I'm sure he was real thrilled to come home to my new project started!)

So here you have it. Unfortunately, I didn't take a whole lot of before pictures and my bathroom is narrow, so it was hard to get after pictures, but I think you'll get a good idea of what it looked like before and what it looks like now.

 We painted the walls off white and painted the medicine cabinet, vanity, mirror frame, closet doors, and floor boards black. *Figured it would be cheaper to paint than to replace.  But, we did replace the toilet, sink top, faucets and light fixture. 
 
*My husband and brother in law replaced the old tile floor with beautiful, new tiles...probably my favorite change in the bathroom.
 
 *I originally picked a smaller light fixture I wasn't happy with, so my husband very kindly replaced it with the one pictured. It's a little big for our small bathroom, but I love it!


*And I put these few pictures on the wall to add a little color...not sure they go with the bathroom, but I found them at Bed Bath & Beyond for $9 and they matched my color scheme, so we kept them!
 
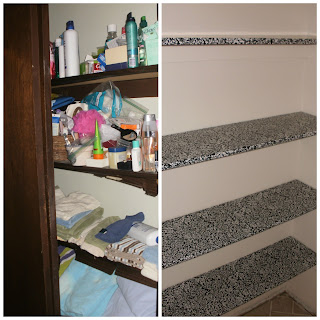
And, lastly, a peek inside the bathroom closet....before and after.  The clutter in that closet had been driving me insane for quite some time!  I just used a black and white designed contact paper I found at Target to line the shelves and bought some red boxes (not pictured) to "organize" all of my stuff. 

Finally, our Bathroom Project is complete and I couldn't be happier!  Now, time to get to work on that entryway!


Sunday, July 14, 2013

Super Quick, Super Cheap Update

I've been working on redecorating my living room for over a year now. I love neutrals, but this particular section of the living room was looking a little too plain to me. Sorry for the horrible phone pics, my camera is on the outs this week, this is the best it is going to get for now! :)


I was in Hobby Lobby this weekend and decided to buy some supplies to spruce up the pillow that I bought from Home Goods last year. I picked up a monogram "P" (for our last name) in the iron on section and a package of ready made flowers that are actually meant to be made into hair accessories. The "P" was $1.99 and the flowers were $3.99...I also had a 40% off coupon, so this little update cost me less than $4.00.


I used fabric glue to add the "P" to the middle of the pillow and broke up the flowers to create two clusters on the corners of the pillow. For about 5 minutes of my time and less than four dollars, I have an updated decorative pillow that adds that little something that this corner of the living room needed.


Have you worked on any quick and cheap projects lately?


Monday, July 8, 2013

4th of July

Happy Monday! I hope everyone had a lovely and safe long holiday weekend! Over here at my house I have several unfinished projects going on right now, and really not that much to post about these days (until I get my butt in gear and finish!)  So despite of my unfinished projects/rooms I decided (last minute) to have some friends over for the 4th.  I wish I had some cute decorations or centerpieces or something that I made to show you but all my time went to cleaning and food preparing. So putting my American flag out on my porch was as about as festive as it got. I did attempt to bake red, white and blue cupcakes.


Just an FYI this picture was taken the day after the party so that's why the icing is melted and the strawberry looks a little wilted!

Anyway the real point of this post is to show off our adorable kids! Our kids play together so well and in my opinion are the cutest ever!

Future MLB star!

Also wanted to show off the ever stylish and festive Hooch in her hat! She had red shoes on too!

Whenever we try to get a picture of our girls together it always ends up looking like this....


so we end up taking one like this!
 
 
I hope everyone had a fun-filled 4th and is enjoying the summer!!

Thursday, July 4, 2013

Happy 4th of July!

Via


Thank you to all who have served or are currently serving our country, because of you, we are the "Land of the Free!"

Monday, July 1, 2013

Alice in Wonderland party

Hold on a second...am I reading the calendar correctly....today is July 1st!?!  Where did June go?!?  Between the end of school and Tball and a whole week of Vacation Bible School, we spent many sunny days of June, outside, playing, swimming, and just enjoying summer!  And to end the month, we got to celebrate my baby girl's birthday.
 Julia just had her 3rd birthday, and we celebrated with an Alice in Wonderland party!  Ever since I recorded the 1951 animated classic back in March, Julia has watched Alice in Wonderland, on average, about 3 times a week.  She loves it!  And every time, she asks for a pillow and blanket on the floor and popcorn.  So when I was trying to come up with a theme for her 3rd birthday party, we went with her favorite movie! (the alternate was her favorite TV show, Peppa Pig...ultimately, Alice in Wonderland offered alot more party ideas!) 

I started by drawing characters from the movie onto big poster board. I have to say, if I didn't enjoy doing it, I probably wouldn't.  But I had fun drawing the characters (which was just me looking up pictures from the movie online, and then drawing them) and painting them...and the kids and I turned a couple rainy days into indoor arts and crafts activities!


I used blue tableclothes, tea cups and teapots (courtesy of Hooch's Silhouette machine), and cookie plates on the tables.  I also used white bunny ears (courtesy of Stonf), cat face masks and top hats as decoration on the tables.  The cat masks were simply made with purple and white foam paper, purple and black sharpie markers, glue, and large popsicle sticks.  The black hats were purchased from Oriental Trading, and then I glued on a piece of white foam paper with 10/6, just like the movie, and a couple strips of scrap book paper.
 
For cupcakes, I took the idea from the movie of the cookies that Alice eats to grow bigger or smaller.  They said "Eat me", "Try me", and "Take one".

 And, of course, I wanted to use my glass drink dispensers with the "Drink me" labels in which we served cold, sweet tea...for our "tea party". 

 And, we wouldn't be keepin it real if we didn't add thunder, lightning, and rain to this outdoor party!  Luckily, we got our eating, singing Happy Birthday, and most of the presents opened, before the big rains came down!

I think my little "Alice" enjoyed her party...after all, she told me it was the best party ever!

Wednesday, June 19, 2013

HSB Goes...Blog Hoppin'

Hey there! Just wanted to stop in and let you know that I am guest posting today on Ashley's blog The Domestic Wannabe...I'm sharing a typical day for me on her "a day in the life" series. Click here to check it out!

Thanks so much for having me over Ashley! :)

Monday, June 17, 2013

Organizing Hair Accessories

It seems that as my daughter gets older, she accumulates more and more hair accessories. Over the weekend, she was helping me clean her room when I realized that the old headband storage system that I made by covering an oatmeal container with scrapbook paper was no longer large enough to hold all of her headbands. I still had ribbon left over from when I converted an old frame to a hair bow holder, so I pulled out the ribbon and my glue gun and got to work.

I honestly cannot explain how easy this was to make! It took me about 10 minutes total to create storage for multiple headbands. You will want to use a thick, wide ribbon as the base of the holder and use a smaller width ribbon to create the hanging portion of the holder. I simply used the glue gun to create loops using the smaller ribbon, as you can see in the pictures below. You can create as many loops as you need by making your base ribbon longer or shorter. My finished holder allows storage for a total of eight headbands.


Once I was finished gluing my loops, I used the small ribbon to attach a loop to the top back portion of the hanger...this will allow you to hang the headband holder on the wall. I ended up hanging the holder next to the hair bow organizer that I created (click here for the details on the hair bow organizer) to allow my daughter to choose her own accessories each day.


I love this project, it was easy, fast, completely free (since I already had all of the supplies on hand) and helped to bring some organization to Felicity's room. As always, thanks for visiting! :)